We are living in the remote work era and for software development management it has become key to have transparent means to monitor the work of their teams. This post shows how to set up GrimoireLab to check not only the stability and throughput of software development teams, but also the collaboration between team members and with other teams in large or distributed organizations.
GrimoireLab, the Bitergia Analytics core open source toolkit, is able to track information from several development platforms. Most of them are related to open source development, but they are also used for private internal development in companies. We know GrimoireLab community members that have deployed the toolkit for their own development following the procedures explained in GrimoireLab README.md.
GrimoireLab supports many platforms, several of which are mostly used for that private internal development, like:
- Github private repositories
- GitHub Enterprise
- GitLab private repositories
- GitLab on prem
- JIRA private instances
- Slack private workspaces and channels
For most of these platforms, administrators and developers have access by an access token or by oauth access. Setting up this kind of private access in GrimoireLab can be a little bit tricky. So, in this blog post I’ll explain how to set up GrimoireLab for a self-hosted GitLab instance, as an example.
Use case: GNOME Software Development
I am a GNOME fanboy, and a couple of years ago (like some other open source projects lately), the project moved to a self-hosted GitLab instance:
“the GNOME community chose GitLab as the best free software tool to simplify the contributor experience, make decision processes more transparent and accessible to the wider community, and improve the stability and deliverability of GNOME Project software” .
Source: GNOME News
Since then, I’ve been wondering how to use GrimoireLab to analyze the development of such an amazing desktop and its associated applications.

The GNOME community mainly contributes to their projects through 3-4 platforms:
- Git code repositories in a GitLab instance hosted at gitlab.gnome.org. So it would be the same case as companies that self host GitLab for their internal software development projects.
- Issues and merge requests through the repositories in the GitLab GNOME instance mentioned before.
- Several mailing lists.
- Several IRC channels in irc.gnome.org server.
So, we can analyze GNOME projects, the same way any company can use GrimoireLab to analyze their own internal development. For this post, I’ll work only with information from git, GitLab issues and merge requests, and the mailing lists.
Setting up the environment
Requirements for GrimoireLab are not too heavy. You can run it in your laptop or, on simple Digital Ocean droplets or AWS Lightsail instances running a Linux distribution on 2 vCPUs, 4GB memory RAM, and enough virtual memory for Elasticsearch would be enough. For example, I’ll use the following infrastructure:

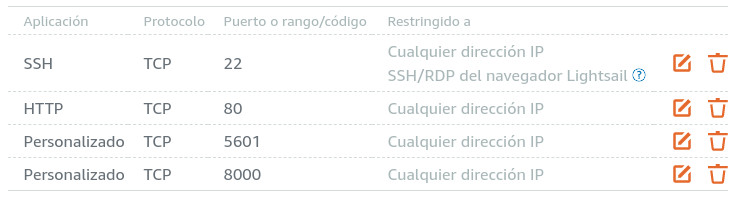
We should ensure that ports 5601 and 8000 are accessible from outside. For example, in AWS Lightsail is a matter of changing firewall network rules:
You can prepare the environment manually or use a provisioning tool like Terraform and Ansible. We would love the GrimoireLab community to contribute recipes to help other community members to set up everything.
For this blog post, I manually set up the machine’s virtual memory (VM) subsystem, docker, and docker-compose to deploy and run GrimoireLab. In my AWS Lightsail instance, I ran:
sudo sysctl -w vm.max_map_count=262144
sudo apt update
sudo apt-get -y install apt-transport-https ca-certificates curl gnupg2 software-properties-common
curl -fsSL https://download.docker.com/linux/debian/gpg | sudo apt-key add -
sudo add-apt-repository "deb [arch=amd64] https://download.docker.com/linux/debian $(lsb_release -cs) stable"
sudo apt-get update,
sudo apt-get -y install docker-ce docker-ce-cli containerd.io
sudo groupadd docker
sudo usermod -aG docker $USER
sudo curl -L "https://github.com/docker/compose/releases/download/1.24.1/docker-compose-$(uname -s)-$(uname -m)" -o /usr/local/bin/docker-compose
sudo chmod +x /usr/local/bin/docker-compose
After all these commands, I have a machine ready to play with:
Now, it’s time to clone GrimoireLab repository to the machine:
git clone https://github.com/chaoss/grimoirelab
Setting up GrimoireLab
Next, we are going to set up GrimoireLab to analyze git, GitLab, and mailing lists activity for several GNOME projects.
First, we need to register an account for gitlab.gnome.org to get our personal access token, which is needed to allow GrimoireLab to gather the data from the GNOME GitLab instance. This procedure is the same we would use to collect data from our own company’s private on-premises GitLab or GitHub Enterprise instances.
Now, we edit grimoirelab/grimoirelab-default-settings/setup.cfg which is located in the cloned repository:
Un-comment the [pipermail] section to leave it as follows:[pipermail]
raw_index=pipermail_demo_raw
enriched_index=pipermail_demo_enriched
no-verify=true
And un-comment and edit the [gitlab:issues] and [gitlab:merge] to add the personal access token information and the custom GitLab instance address:

You can read more about this setup.cfg file in its dedicated GrimoireLab’s documentation.
Now, it’s time to add some projects to analyze. For example, let’s go for Nautilus, GIMP, gnome-shell, and gtk. For that, we edit the projects.json file to contain the “map” of data sources and repositories that define each project as described in the projects.json file documentation. Pro-tipp, check the JSON file for correct syntax to make sure it will be read correctly:
{
    "Nautilus": {
            "git": ["https://gitlab.gnome.org/GNOME/nautilus.git"],
            "gitlab:issues": ["https://gitlab.gnome.org/GNOME/nautilus"],
            "gitlab:merge": ["https://gitlab.gnome.org/GNOME/nautilus"],
            "pipermail":["https://mail.gnome.org/archives/nautilus-list/"]
    },
    "GIMP": {
            "git": ["https://gitlab.gnome.org/GNOME/gimp.git"],
            "gitlab:issues": ["https://gitlab.gnome.org/GNOME/gimp"],
            "gitlab:merge": ["https://gitlab.gnome.org/GNOME/gimp"],
            "pipermail": [
                    "https://mail.gnome.org/archives/gimp-developer-list/",
                    "https://mail.gnome.org/archives/gimp-docs-list/",
                    "https://mail.gnome.org/archives/gimp-gui-list/",
                    "https://mail.gnome.org/archives/gimp-user-list/",
                    "https://mail.gnome.org/archives/gimp-web-list/"
            ]
    },
    "gnome-shell": {
            "git": ["https://gitlab.gnome.org/GNOME/gnome-shell.git"],
            "gitlab:issues": ["https://gitlab.gnome.org/GNOME/gnome-shell"],
            "gitlab:merge": ["https://gitlab.gnome.org/GNOME/gnome-shell"],
            "pipermail": ["https://mail.gnome.org/archives/gnome-shell-list/"]
    },
    "gtk": {
            "git": ["https://gitlab.gnome.org/GNOME/gtk.git"],
            "gitlab:issues": ["https://gitlab.gnome.org/GNOME/gtk"],
            "gitlab:merge": ["https://gitlab.gnome.org/GNOME/gtk"],
            "pipermail": [
                    "https://mail.gnome.org/archives/gtk-app-devel-list/",
                    "https://mail.gnome.org/archives/gtk-devel-list/",
                    "https://mail.gnome.org/archives/gtk-doc-list/",
                    "https://mail.gnome.org/archives/gtk-i18n-list/",
                    "https://mail.gnome.org/archives/gtk-list/",
                    "https://mail.gnome.org/archives/gtk-osx-devel-list/",
                    "https://mail.gnome.org/archives/gtk-osx-users-list/",
                    "https://mail.gnome.org/archives/gtk-perl-list/"
            ]
    }
}
Now we are ready to run GrimoireLab!
Running GrimoireLab
First, go to grimoirelab/docker-compose folder and run:
docker-compose up -d
After some packages download and deployment using docker magic you should end with an “all green” lines like these:

That means GrimoireLab is gathering and processing the data. Since it tries to get all the historic information, it will take some time, but after some minutes you should be able to visit your cloud instance IP under 5601 port (the standard Kibana port) to see the nice GrimoireLab dashboard:

Next steps
Following the above steps, you have successfully deployed GrimoireLab for a self-hosted GitLab and you can already check some metrics like activity, issues and merge requests timing (Lead Time, time to first attention, etc.), and many more. Now what?
Well, the first thing you can do is to improve the GNOME developers’ affiliation and profile data. The big green ring in the middle of the dashboard shows that no Organizational affiliations are known yet. If you are running GrimoireLab for analyzing your internal development, you might want to associate developers to the teams they work for. To do it, you can go to the web interface available on port 8000.

This tool is called HatStall, and it’s the web interface for SortingHat. Currently we are working on a GraphQL API for SortingHat, and once the first version is ready, we would like to have a new web interface.
The second thing you can do is to add more projects by updating the projects.json. You won’t need to restart the docker-compose, since GrimoireLab periodically reads the content of the projects.json.
If you are a GitHub Enterprise user, you can replicate what you have just read on a GitHub Enterprise instance. The process is quite similar, and with some minor changes in the setup.cfg you will be able to get data and metrics from your own GitHub instance:
[github]
api-token=<YOUR-GITHUB-ENTERPRISE-ACCESS-TOKEN>
enterprise-url=<YOUR-GITHUB-ENTERPRISE-URL>
…
If you want to contribute or suggest ideas about how to improve and to simplify GrimoireLab’s setup process, that would be super-helpful. Feel free to leave comments to this post or to open issues in the GrimoireLab repository!
Please, try it and let us know about your experience. We’d also love adding support for these “private” environments in Cauldron.io soon 😉 What do you think?